Using the Local Partner Portal for data collection
Content
This article will discuss the following topics:
What is the Local Partner Portal?
Data collection
Dashboard overview
Polygon validity
Inviting data collectors
Managing your data collectors
Viewing your farmer data
Bulk action on data: Exporting, removing and recollecting
Performing actions on individual farm profiles
Recollection
What is the Local Partner Portal?
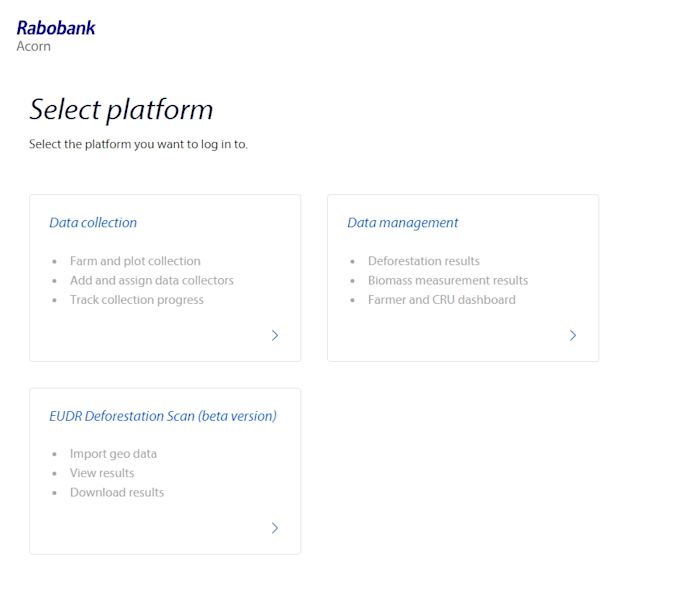
The Local Partner Portal is a platform designed to support Acorn's Local Partners in data collection and management. It has three main components:
Data Collection
Data Management
EUDR Deforestation Scan
The portal helps you manage various aspects of the project, from data collection to farmer payouts. Use the 'Data Collection' tile for information on data gathering, and the 'Data Management' tile for insights into deforestation cases of your project, CRU generation, and payouts.
If you're concerned about compliance with the European Union Deforestation Ruling, you can use the 'EUDR Deforestation Scan' tile to get a rough indication of your polygon statuses. Note that this scan is just for guidance and is not a binding evaluation.

LP portal - Data collection overview
After selecting Data collection, you will be redirected to a platform where you can:
View polygon visuals on the Dashboard to help with quality checks.
Manage Data Collectors through the Data Collector overview, where you can invite new collectors, disable accounts, and view statistics.
Manage farm data in the farm overview, which provides all farm data and allows you to take bulk actions like exporting, reassigning, or recollecting farmer profiles.
Monitor plots in the plot overview, similar to the Farm overview but focused on plot-level data. You can also resolve any warnings from this view.

Dashboard overview
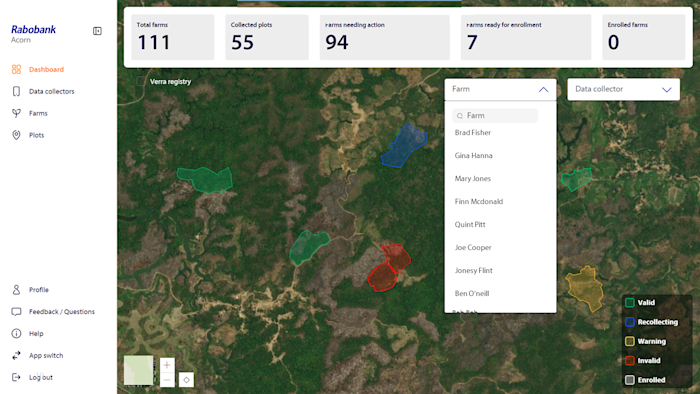
The dashboard provides visual representations of your project's onboarding progress to help with quality checks. It includes:
Data statistics: At the top of the page, you can see project statistics, including the number of collected farms, number of collected plots, farmers needing action, farms ready for enrolment, and enrolled farms.
Filtering options: You can filter by farmers or Data Collectors to focus on specific data sets. Since data quality can differ between different Data Collectors, consider evaluating polygon quality on a per-collector basis.
Color-coding: Polygons are color-coded based on their status and validity, making it easier to identify issues. More on this in the next section.
Tip: Select a plot to be redirected to the respective Data Collector or farm profile.

Polygon validity
On the dashboard, a legend explains the meaning of different polygon colors to help you verify data:
Green: The polygon is technically valid and passes three basic checks: no overlap, no intersecting lines, and larger than 0.1 hectares. However, this does not guarantee high quality, so the Local Partner must still check whether the polygon looks good. Read this article to learn to identify problematic data.
Blue: The plot is being recollected and is currently stored on the Data Collector’s device. It cannot be edited by the Local Partner. Ask the Data Collector to submit the farm profile to unlock the profile.
Yellow: A warning was placed on the plot indicating potential issues like GPS inaccuracies or building overlaps. These are just suggestions and can be ignored if not relevant.
Red: The polygon is invalid, usually due to overlap. Recollect the profile to fix it.
White: The profile has been enrolled in the Acorn platform and can now start generating CRUs.

Inviting Data Collectors
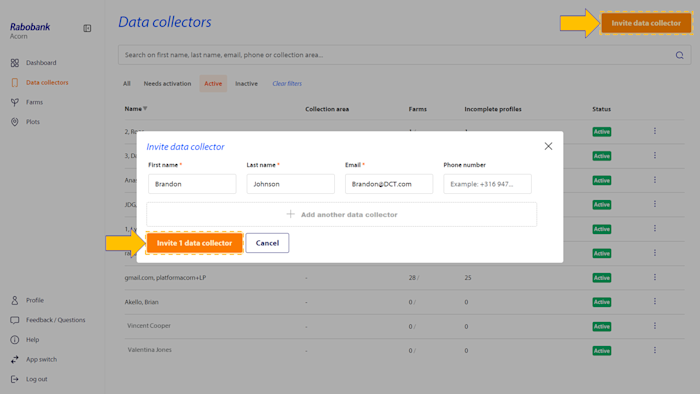
Data Collectors are essential for your data collection efforts. To invite a Data Collector:
Click "Invite Data Collector" in the top right corner.
Enter their first name, last name, email, and phone number (optional).
If needed, you can invite multiple collectors at once.
Click "Invite Data Collector".

Managing Data Collectors
In the Data collection overview, you can manage Data Collector profiles:
Disable access: If a Data Collector is no longer working with you, or stops working for a long time, disable their account. This ensures they will not be able to access the DCT app or farmer data. This prevents unauthorized data collection.
Enable access: If a Data Collector returns after having left for a while, you can re-enable their account, allowing the collector to log in again.
Resend invitation: If a Data Collector hasn’t opened their invitation email, it may be in their spam folder. You can resend the invitation from the overview.
Click the three dots next to a Data Collector's name to see which actions you can take.

Viewing farm data
From the Farms overview, you can track the progress of farm profiles and resolve issues. Selecting a profile takes you to detailed farm and plot information. The overview includes five quick filters:
All: All profiles in your project.
Needs action: Profiles that are not yet complete or that have outstanding issues, such as plot warnings or issues with the Participant Agreement. If your project uses the profile sign-off feature, profiles without any issues can also be found under 'Needs action'. To move them to 'Ready for enrollment', check the profile's data and sign it off.
Collecting: Profiles that have been sent back to the Data Collector for recollection and are stored on their device.
Ready for enrolment: Profiles with no pending actions that need a final data quality check.
Enrolled: Profiles that are fully enrolled and can start generating CRUs.

Filtering farm data
To better assist in going through the process of checking your data, filters have been added to the overview. If your project uses the 'profile sign-off' feature, an additional filter appears to filter on signed-off profiles.
Tip: Filtering on date can help with data quality checks.

Exporting, removing, reassigning and recollecting multiple farm profiles at the same time
Bulk actions allow you to perform tasks on multiple farm profiles at the same time, rather than handling each one individually. To perform bulk actions on farm profiles:
Select profiles by clicking the checkbox next to the "Name" column.
Optional: Deselect any profiles you don’t want to include.
You can select all profiles across multiple pages by clicking "Select all ... farmers"
From there, you can perform these bulk actions:
Export farmer data: Export selected farmer data as a CSV or Excel file.
Reassign profiles: You can (re)assign all selected profiles to one Data Collector. This can be useful if a Data Collector will visit a village and needs to (re)collect data of all farmers in that village.
Reassignment does not automatically send profiles to a Data Collector's phone. Recollection is needed for this.
Recollect profiles: You can also recollect farmer profiles in bulk. This will send the profiles
Remove profiles: Although not recommended, you can remove multiple profiles if they are falsified or unusable. Warning: Removed profiles cannot be recovered.

Deleting or recollecting individual farm profiles
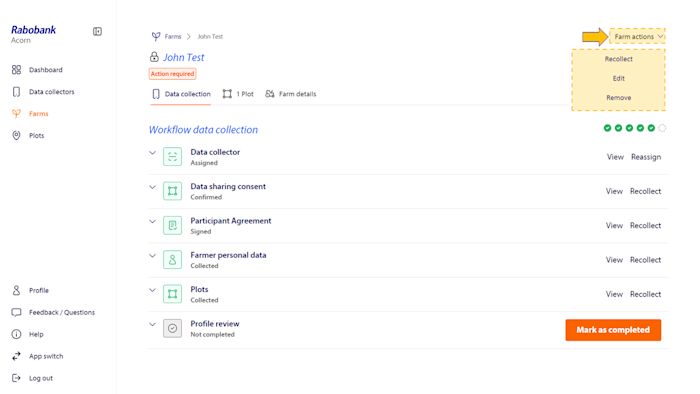
If you want to delete or recollect individual farm profiles instead of using bulk actions, follow these steps:
Open the farm profile on the LP portal
In the top-right corner, click on 'Farm actions'
Three options will appear: 'Recollect', 'Edit' or 'Remove'
Click on the relevant option, and you're done!

Deleting individual plots
If you want to delete individual plots without deleting the farm profile, follow these steps:
Open the plot page on the LP portal
In the top-right corner, click on 'Remove plot'
